The BlueConic SDK for Android makes it easy for developers to collect profile data from their apps. This section explains how to integrate BlueConic into Android apps. If you are looking for information on iOS apps, see the BlueConic SDK for iOS.
You can use the SDK to do the following:
- Set and retrieve profile property values
- Serve (custom) dialogues
- Track user behavior using listeners
The BlueConic SDK for Android provides the basis for communication with BlueConic. It provides possibilities to develop your own interactions by creating mobile plugins. Developers can create their own mobile plugins and implement them in their Android app.
Before you begin
Before you start implementing the SDK, make sure you meet the following requirements:
- The minimum SDK version supported by the SDK is 21. Make sure that your app is compatible with this.
- Setup your mobile application in BlueConic and enable it. In order to do that follow the steps described in the article Enabling a mobile app for BlueConic.
Getting started
Note
The latest SDK version is 6.0.0.
Warning
If you plan to upgrade your SDK version from an older version to 6.x.x check the migration guide here.
Before you start implementing the SDK, perform the following tasks:
-
Add the SDK dependency under your app build.gradle:
dependencies {
    implementation 'com.blueconic:blueconic-android-lib:6.0.0'
}
dependencies { implementation("com.blueconic:blueconic-android-lib:6.0.0") } -
Set up Proguard
If you're using Proguard to optimize and minify your app, you must add the following rules to prevent Proguard from removing the SDK:-keep class com.blueconic.** { *; } -
Initialize the SDK
The Android SDK should be configured using a BlueConicConfiguration object and a builder class in the Application class. The BlueConic SDK should be initialized before any other SDK API calls are made.
// Create the BlueConicConfiguration with your specific URL.
val blueConicConfiguration = BlueConicConfiguration.Builder()
    .setHostName([BlueConic server url]) // Replace with hostname of the BlueConic server
    .setOverrideAppId(overrideAppId) // Set this only if you need your app ID to be different than your package name
    .build(applicationContext)

// Initialize the SDK.
BlueConicClient.getInstance().initialize(blueConicConfiguration, object : Callback {
    override fun onSuccess() {
        // BlueConic SDK is initialized
    }

    override fun onError(error: Error) {
        Log.d("BlueConic", "Error initializing BlueConic SDK: $error")
    }
})
// Create the BlueConicConfiguration with your specific URL. BlueConicConfiguration blueConicConfiguration = new BlueConicConfiguration.Builder() .setHostName([BlueConic server url]) // Replace with hostname of the BlueConic server .setOverrideAppId(overrideAppId) // Set this only if you need your app ID to be different than your package name .build(getApplicationContext()); // Initialize the SDK. BlueConicClient.getInstance().initialize(blueConicConfiguration, new Callback() { @Override public void onSuccess() { // BlueConic SDK is initialized } @Override public void onError(Error error) { Log.d("BlueConic", "Error initializing BlueConic SDK: " + error); } });
Using the BlueConic Android SDK
Understanding Callback information
Almost all SDK API methods allow for an optional Callback interface to be passed at the method invocation point to receive information from the SDK about whether the operation was successful or failed. The structure of the interface is as follows:
object : Callback {
    override fun onSuccess() {
        // The API operation was successful
    }

    override fun onError(error: Error) {
        // The error for the API operation
    }
}
new Callback() {
    @Override
    public void onSuccess() {
        // The API operation was successful
    }

    @Override
    public void onError(Error error) {
        // The error for the API operation
    }
}
The Error object contains the following error types that the SDK can trigger:
NotEnabled
AlreadyEnabled
InteractionRetrievalError
InvalidParameters
InternalError
UnsupportedAndroidAPI
Create a page view event
Typically, you want to create a BlueConic page view event each time the 'onResume' method of an Activity is called. When switching screens without actually switching Activities, you can still call the page view event. Just make sure that a unique screen name is passed in the call. The screen name is shown in the BlueConic Simulator, and it can be used to restrict dialogue interactions to specific screens.
// Get the BlueConicClient instance.
val blueConicClient: BlueConicClient = BlueConicClient.getInstance()

// Configure additional properties if needed
val properties = mutableMapOf<String, String>().apply {
    put("property", "value")
}

//Trigger the event
blueConicClient.createPageViewEvent("screenName", activity, properties, object : Callback {
    override fun onSuccess() {
        //Operation was successful
    }

    override fun onError(error: Error) {
        Log.d("BlueConic", "Error sending PAGEVIEW event with error: $error")
    }
})
// Get the BlueConicClient instance.
BlueConicClient blueConicClient = BlueConicClient.getInstance();

// Configure additional properties if needed
Map<string, string="String"> properties = new HashMap<>();
properties.put("property", "value");

// Trigger the event
blueConicClient.createPageViewEvent("screenName", activity, properties, new Callback() {
    @Override
    public void onSuccess() {
        // Operation was successful
    }

    @Override
    public void onError(Error error) {
        Log.d("BlueConic", "Error sending PAGEVIEW event with error: " + error);
    }
});
The "screenName" property sent via a PAGEVIEW event is used by BlueConic to identify the location in the app.
Now the BlueConic user can retrieve the screen name "Main/Section1" as a value like so (using the regular expression (.*)):
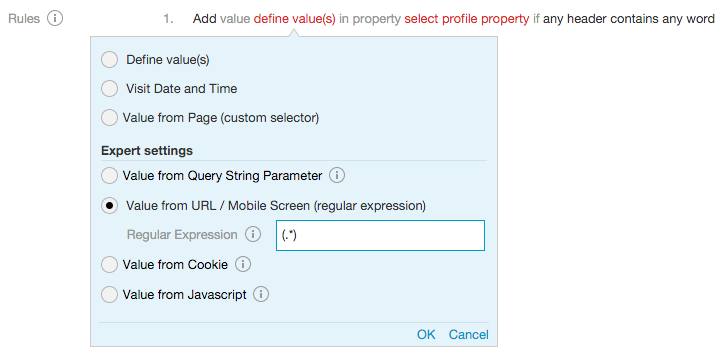
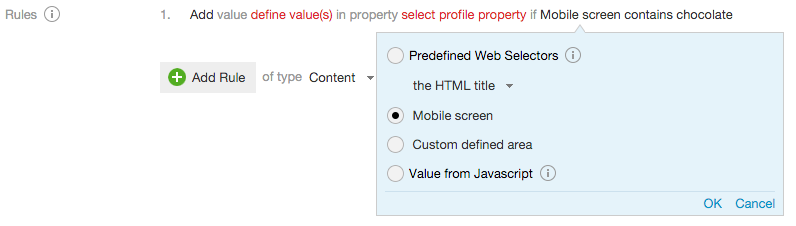
The BlueConic user can add values when the Mobile Screen name contains certain words. Create a rule of type "URL / Mobile Screen" and configure the Mobile Screen name to listen to:

Once the "PAGEVIEW" event is triggered, the current screen name is saved in the SDK. You can use this value to validate that the SDK is currently registered to the desired screen. To retrieve the value use the following method:
val screenName = blueConicClient.screenName
String screenName = blueConicClient.getScreenName();
Configure consent
In order to configure the consent information for the BlueConic SDK you can use the following methods:
// Get the SDK privacy legislation.
val privacyLegislation = blueConicClient.privacyLegislation

// Configure the SDK privacy legislation (e.g. GDPR, CCPA).
blueConicClient.privacyLegislation = "GDPR"

// Add consented objective.
// First, the objectives need to be configured in the BlueConic platform.
blueConicClient.addConsentedObjective("Marketing")

// Add refused objective.
// First, the objectives need to be configured in the BlueConic platform.
blueConicClient.addRefusedObjective("Tracking")
// Get the SDK privacy legislation.
String privacyLegislation = blueConicClient.getPrivacyLegislation();

// Configure the SDK privacy legislation (e.g. GDPR, CCPA).
blueConicClient.setPrivacyLegislation("GDPR");

// Add consented objective.
// First, the objectives need to be configured in the BlueConic platform.
blueConicClient.addConsentedObjective("Marketing");

// Add refused objective.
// First, the objectives need to be configured in the BlueConic platform.
blueConicClient.addRefusedObjective("Tracking");
To configure consent information in BlueConic read more about it in the following article: Privacy management in BlueConic.
Clean up BlueConic interactions
Creating a page view event will dynamically load interactions (dialogues and listeners) in the app. These interactions will be active until the 'onPause' method of the Activity is called, at which point the interactions are destroyed. For apps where page views are called without switching Activities, it is necessary to explicitly call 'destroyPlugins' on the BlueConicClient when the user switches screens.
blueConicClient.destroyPlugins()
blueConicClient.destroyPlugins();
Create a timeline event
The BlueConic SDK supports the ability to send timeline events using the following dedicated methods:
// Set the properties of the timeline event.
val properties = mutableMapOf<String, Any>().apply {
    put("propertyKey", "propertyValue")
    put("propertyNestedMap", mapOf(
        "nestedKey" to "nestedValue",
        "nestedKey2" to 123,
        "nestedKey3" to true)
    )
}

// Trigger the timeline event.
// Note that when using this method, the ID of the timeline event will be an automatically generated UUID.
blueConicClient.createTimelineEvent("MY_TIMELINE_EVENT", Date(), properties)

// Trigger the timeline event by ID.
blueConicClient.createTimelineEventById("MY_TIMELINE_ID", "MY_TIMELINE_EVENT", Date(), properties)
// Set screen name to identify the activity.
final Map<String, Object> properties = new HashMap<>();
      properties.put("propertyKey", "propertyValue");
      properties.put("propertyNestedMap", new HashMap<String, Object>() {
          put("nestedKey", "nestedValue");
          put("nestedKey2", 123);
          put("nestedKey3", true);
      }
);

// Trigger the timeline event.
// Note that when using this method, the ID of the timeline event will be an automatically generated UUID.
blueConicClient.createTimelineEvent("MY_TIMELINE_EVENT", new Date(), properties, null);

// Trigger the timeline event by ID.
blueConicClient.createTimelineEventById("MY_TIMELINE_ID", "MY_TIMELINE_EVENT", new Date(), properties, null);
To learn more about timeline events and how to configure them in BlueConic, check out the following article: Overview: Timeline events in BlueConic.
Use custom selectors to track page elements automatically
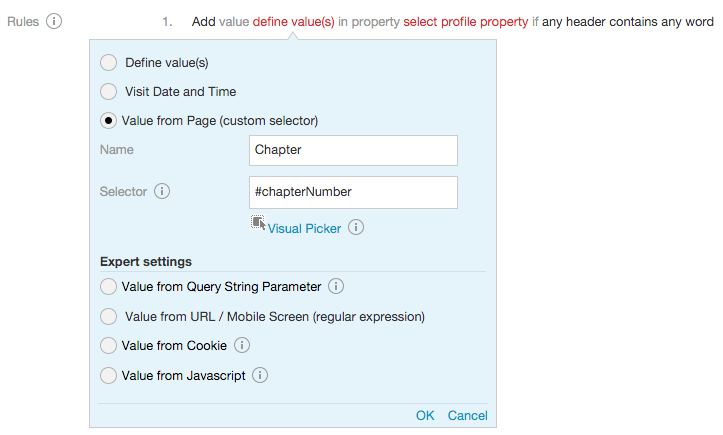
Some screens of our mobile app contain a view ID that we would like to pick up in BlueConic. As an example, create a new Behavior Listener in BlueConic and add a content rule. Define the value as "Value from Page (custom selector)" with a human readable name, e.g. "Chapter".
Use the ID of a resource, replacing @+id/ or @id/ with a # sign. Only textview or button components will be recognized. For example, use #chapterNumber in BlueConic when your app code defines a textview component like this:
<TextView
    android:id="@+id/chapterNumber"
    android:layout_width="wrap_content"
    android:layout_height="wrap_content"
    android:text="1" />
This allows the BlueConic user to define values:
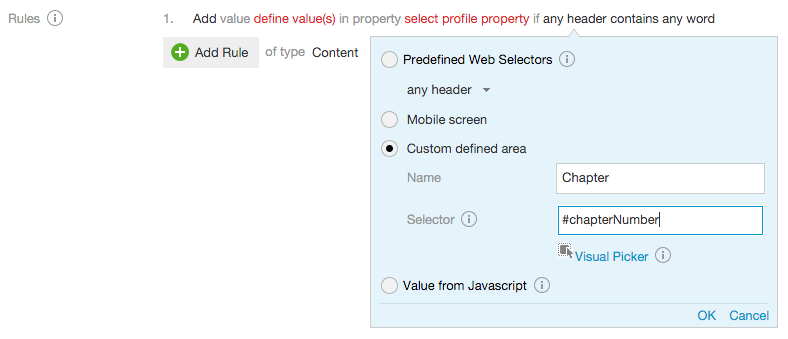
It allows the BlueConic user to define a custom area that should contain words:
The BlueConic user can listen for appearance of words on the mobile screen:

When the mobile screen is refreshed, the BlueConic SDK will retrieve the components present on the page and automatically scan their values for a match. Take into account that you can only detect text from TextView and Button components.
Gather Profile information
When you first interact with BlueConic using the SDK a profile ID is generated. This profile ID can be used to identify users in BlueConic. To retrieve the BlueConic assigned profile ID, you can use the following method:
val profileId = blueConicClient.profileId
String profileId = blueConicClient.getProfileId();
The BlueConic SDK supports the ability to get or set a profile property directly from inside the app. Ask your BlueConic users for the ID of the profile property in BlueConic and use one or more of the following BlueConic methods from the SDK:
// Get profile property value
val profileProperty: String? = blueConicClient.getProfileValue("propertyKey")
// Get profile property values (for multi-value properties)
val profileProperties: Collection = blueConicClient.getProfileValues("propertyKey")

// Set profile property value
// Passing a property that was already set with values will cause for the old values to be removed.
blueConicClient.setProfileValue("propertyKey", "propertyValue")

// Set profile property values (for multi-value properties)
// Passing a property that was already set with values will cause for the old values to be removed.
blueConicClient.setProfileValues("propertyKey", listOf("propertyValue1", "propertyValue2"))

// Add profile property value
// If there are already values for a property the new value will be added.
blueConicClient.addProfileValue("propertyKey", "propertyValue")

// Add profile property values (for multi-value properties)
// If there are already values for a property the new values will be added.
blueConicClient.addProfileValues("propertyKey", listOf("propertyValue1", "propertyValue2"))

// Increment profile property value
// If there are already values for a property the new value will be the sum of all values.
blueConicClient.incrementProfileValue("propertyKey", 1.toString())

// Update the profile to sync over the data from the Mobile app to the BlueConic servers and also pull in the data that has changed on the BlueConic side.
blueConicClient.updateProfile(object : Callback {
    override fun onSuccess() {
        // Operation was successful
        // This callback is called when the update is finished.
        // You can now retrieve the new values from the profile.
    }

    override fun onError(error: Error) {
        Log.d("BlueConic", "Error: $error")
    }
})
// Get profile property value
String profileProperty = blueConicClient.getProfileValue("propertyKey");
// Get profile property values (for multi-value properties)
Collection<String> profileProperties = blueConicClient.getProfileValues("propertyKey");

// Set profile property value
// Passing a property that was already set with values will cause for the old values to be removed.
blueConicClient.setProfileValue("propertyKey", "propertyValue");

// Set profile property values (for multi-value properties)
// Passing a property that was already set with values will cause for the old values to be removed.
blueConicClient.setProfileValues("propertyKey", Arrays.asList("propertyValue1", "propertyValue2"));

// Add profile property value
// If there are already values for a property the new value will be added.
blueConicClient.addProfileValue("propertyKey", "propertyValue");

// Add profile property values (for multi-value properties)
// If there are already values for a property the new values will be added.
blueConicClient.addProfileValues("propertyKey", Arrays.asList("propertyValue1", "propertyValue2"));

// Increment profile property value
// If there are already values for a property the new value will be the sum of all values.
blueConicClient.incrementProfileValue("propertyKey", "1");

// Update the profile to sync over the data from the Mobile app to the BlueConic servers and also pull in the data that has changed on the BlueConic side.
blueConicClient.updateProfile(new Callback() {
    @Override
    public void onSuccess() {
        // Operation was successful
        // This callback is called when the update is finished.
        // You can now retrieve the new values from the profile.
    }

    @Override
    public void onError(Error error) {
        Log.d("BlueConic", "Error: " + error);
    }
});
A common use case for setting profile properties directly is to store attributes of the user, especially those that can be used for profile merging across devices. To do this, you would first need to note the ID of the user and email address profile properties you wish to populate (e.g. user_id and email). Then, the setProfileValue method should be used to populate these profile properties accordingly.
If it is required to reset your profile ID locally on the device, use the following method:
blueConicClient.clearProfileId(object : Callback {
    override fun onSuccess() {
        //Operation was successful
    }

    override fun onError(error: Error) {
        Log.d("BlueConic", "Error: $error")
    }
})
blueConicClient.clearProfileId(new Callback() {
    @Override
    public void onSuccess() {
        // Operation was successful
    }

    @Override
    public void onError(Error error) {
        Log.d("BlueConic", "Error: " + error);
    }
});
Publish Events
The BlueConic SDK allows you to send events to BlueConic. This allows you to keep BlueConic informed of what is happening in your app, even when it happens outside the scope of the basic operations.
Events are sent using the BlueConicEventManager's dedicated functions. Several kinds of events can be published:
- ClickEvent
- This event signals to BlueConic that a component with a specific ID has been clicked in your app.
- UpdateContentEvent
- This event signals to BlueConic that the content of a component with a specific ID has updated its content and also passes on the updated content.
- UpdateValuesEvent
- This event signals to BlueConic that a component with a specific ID has received an updated list of values and passes on these updated values.
- FormSubmitEvent
- This event signals to BlueConic that the form with a specific ID has been submitted.
- AdvancedEvent
- This allows you to send a custom event to BlueConic with its own specific name and a list of values.
Click event
BlueConic enables users to indicate the button that defines the click area in a Click / Tap rule as follows:
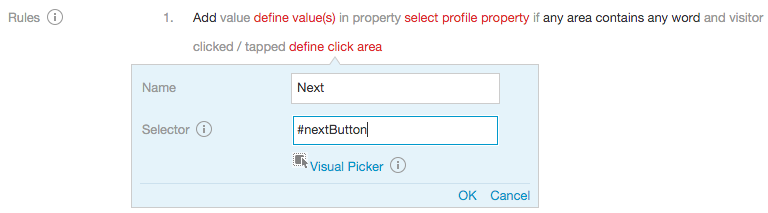
To make this work for your BlueConic users, add the following code to your app:
// Use EventManager to publish the event to BlueConic
val eventManager = BlueConicClient.getInstance().eventManager

// Publish click event for selector "#nextButton"
eventManager.publishClickEvent("#nextButton")
eventManager.publishClickEvent("#nextButton", listOf("value"))
// Use EventManager to publish the event to BlueConic
BlueConicEventManager eventManager = BlueConicClient.getInstance().getEventManager();

// Publish click event for selector "#nextButton"
eventManager.publishClickEvent("#nextButton");
eventManager.publishClickEvent("#nextButton", listOf("value"));
Updating content
BlueConic enables you to detect words on the mobile screen:
The BlueConic SDK will scan the mobile screen upon loading the view for the first time. But what if you change the contents of the screen without reloading the view?
To enable this for the BlueConic users at your site, publish an UpdateContentEvent. Add the following code to your app:
// Use EventManager to publish the event to BlueConic
val eventManager = BlueConicClient.getInstance().eventManager

// Define update content event for textview or button component "body"
eventManager.publishUpdateContentEvent("content", "#body")
// Use EventManager to publish the event to BlueConic
BlueConicEventManager eventManager = BlueConicClient.getInstance().getEventManager();

// Define update content event for textview or button component "body"
eventManager.publishUpdateContentEvent("content", "#body");
Updating values
BlueConic enables you to create a form listening rule that updates a profile property when a form field changes its value:
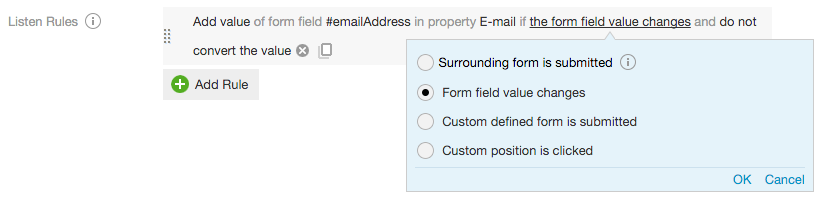
"TextView" and "Spinner" widgets will automatically pick up value changes. All other field types have to be facilitated with code within your app.
To make this work for your BlueConic users for non-supported fields, add the following code to your app:
// Use EventManager to publish the event to BlueConic
val eventManager = BlueConicClient.getInstance().eventManager

// Define update values event for selector "#emailAddress"
eventManager.publishUpdateValuesEvent("#emailAddress", listOf(email))
// Use EventManager to publish the event to BlueConic
BlueConicEventManager eventManager = BlueConicClient.getInstance().getEventManager();

// Define update values event for selector "#emailAddress"
eventManager.publishUpdateValuesEvent("#emailAddress", Collections.singletonList(email));
Now, when the user enters an email address in your app, it will be picked up in BlueConic as well.
Form submit
BlueConic enables you to listen to in-app form submits as follows:
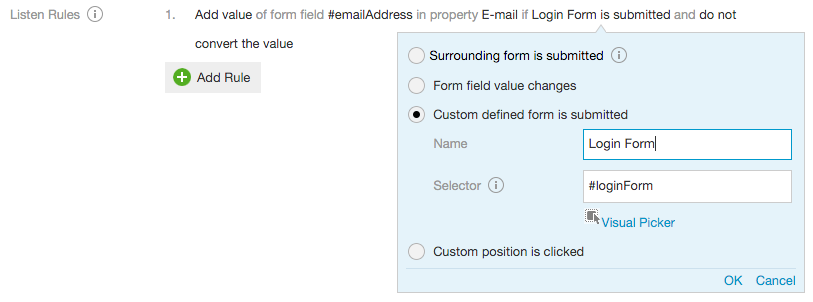
To enable this for your BlueConic users, add the following code to your app:
// Use EventManager to publish the event to BlueConic
val eventManager = BlueConicClient.getInstance().eventManager

// Define form submit event for selector "#loginForm"
eventManager.publishFormSubmitEvent("#loginForm")
eventManager.publishFormSubmitEvent("#loginForm", listOf("value"))
// Use EventManager to publish the event to BlueConic
BlueConicEventManager eventManager = BlueConicClient.getInstance().getEventManager();

// Define form submit event for selector "#loginForm"
eventManager.publishFormSubmitEvent("#loginForm");
eventManager.publishFormSubmitEvent("#loginForm", Collections.singletonList("value"));
Custom-defined event
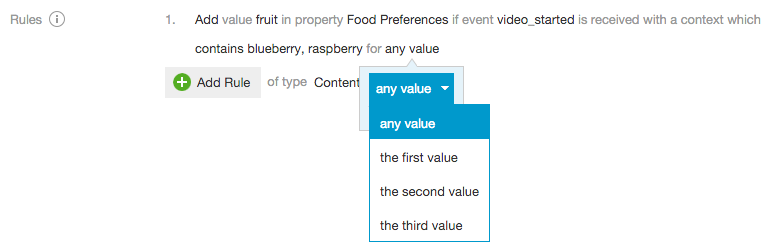
BlueConic enables you to set profile property values when a custom-defined event is received. It even allows you to check for specific values in the context of the event:
To enable this feature for your BlueConic users, add the following code to your app:
val valueList = mutableListOf().apply {
    add("blueberry")
    add("sushi")
    add("pancakes")
}

// Use EventManager to publish the event to BlueConic
val eventManager = BlueConicClient.getInstance().eventManager

// Define advanced event with the name "video_started"
eventManager.publishAdvancedEvent("video_started", valueList)
List valueList = new ArrayList<>();
valueList.add("blueberry");
valueList.add("sushi");
valueList.add("pancakes");

// Use EventManager to publish the event to BlueConic
BlueConicEventManager eventManager = BlueConicClient.getInstance().getEventManager();
// Define advanced event with the name "video_started"
eventManager.publishAdvancedEvent("video_started", valueList);
The app publishes an event with the name "video_started" and a list of three values ("blueberry," "sushi," and "pancakes") is added as context. Adding values is optional; it provides extra information to allow BlueConic users at your site to make more specific rules.
On the BlueConic side, the example rule in the screenshot says "... if event video_started is received with a context that contains blueberry, raspberry for any value". The published example event contains one of those values (blueberry) for the event, which means there is a match. As a result, BlueConic will add the value "fruit" to the profile property "Food Preferences" of the profile for this particular app user.
Adding context
Adding context to an event makes it a lot easier to develop and configure which values a mobile developer is able to use and send through the event to BlueConic, where the event context can be used with BlueConic Listeners. Previously, this had to be configured by using a public UI element in order to retrieve data from a mobile app. Now mobile developers can use private or dynamic values and apply them directly as context to an event. This gives you more control and flexibility to publish BlueConic events within an app, and the BlueConic users at your site can use them to define BlueConic Listeners, without having to know about the internal UI IDs of the mobile app.
Mobile developers can develop these events in their code, for example, to publish a ClickEvent whenever a customer clicks on their favorite sport (code shown below). In addition, you can define a BlueConic Listener to keep track of a customer's favorite category or sport.
You can add the ClickEvent to a function in your app, for example, by adding a click handler a customer interacts with in the UI or when they navigate to a different page.
// Use EventManager to publish the event to BlueConic
val eventManager = BlueConicClient.getInstance().eventManager
eventManager.publishClickEvent("#favoriteSport", listOf("soccer"))
// Use EventManager to publish the event to BlueConic
BlueConicEventManager eventManager = BlueConicClient.getInstance().getEventManager();
eventManager.publishClickEvent("#favoriteSport", Collections.singletonList("soccer"));
Once the developer adds the events within the app, BlueConic users at your site can define BlueConic Listeners to keep track of these events and store data to the profile. To create listeners for these events, they just have to know the selectors the developer used in their events (e.g. “#favoriteSport”).
BlueConic users can use the event feature in any of the following BlueConic Listeners:
- Behavior listener
- Interest Ranker listener
- Rule Based Form listener
- Scoring listener
- Visit listener
Inside these listeners, BlueConic users can define the following rules with the event option:
- Click/tab rule
- Form Submit rule (only accessible in the Rule-Based Form Listener)
- Advanced rule
When setting up the BlueConic Listener, under “Expert Settings,” you select the “Value from context of an event” option, as shown here:
Subscribing to events
BlueConic allows you to subscribe to events received by the SDK from the platform when you use certain plugins or dialogues, in order to receive information from them. To subscribe to events, you can use the BlueConicEventManager with the following code:
// Use EventManager to subscribe to events from BlueConic
val eventManager = BlueConicClient.getInstance().eventManager

// Use to subscribe to specific events from the SDK
eventManager.subscribe(
    eventName = "event", // The name of the event to which you subscribe to
    callbackObject = object : EventHandler { // Callback that is invoked to handle information of the subscribed Event
        override fun handleEvent(event: Event) { // Cast the Event object to your specific event to retrieve event specific data
        }
    },
    onlyOnce = false/true, // Optional parameter specifying if the callback should be invoked only one time
    identifier = "callbackIdentifier" // Optional parameter used to identify the callback that can be used to unsubscribe
)

// Use to unsubscribe from events from the SDK using defined identifier
eventManager.unsubscribe("callbackIdentifier")
// Use EventManager to subscribe to events from BlueConic
BlueConicEventManager eventManager = BlueConicClient.getInstance().getEventManager();

// Use to subscribe to specific events from the SDK
eventManager.subscribe(
    "event", // The name of the event to which you subscribe to
    new EventHandler() { // Callback that is invoked to handle information of the subscribed Event
        @Override
        public void handleEvent(Event event) {
            // Cast the Event object to your specific event to retrieve event specific data
        }
    },
    false, // Optional parameter specifying if the callback should be invoked only one time
    "callbackIdentifier" // Optional parameter used to identify the callback that can be used to unsubscribe
);

// Use to unsubscribe from events from the SDK using defined identifier
eventManager.unsubscribe("callbackIdentifier");
Depending on the configured plugin, the Event Handler function is invoked when the data from the server is received, specifically after PAGE VIEW events. Due to this, it is recommended that you set up your subscribed events before invoking any PAGE VIEW events.
BlueConic users can use the event subscribing feature for any of the following BlueConic plugins:
Properties Dialogue Event
To interact with the Properties-Based Dialogue plugin and receive the configured JSON data in your app, you need to subscribe to the Properties Dialogue Event. The received event in the handler will contain the data. To subscribe to the event, use the following implementation:
// Use EventManager to subscribe to events from BlueConic
val eventManager = BlueConicClient.getInstance().eventManager

// Use to subscribe to specific events from the SDK
eventManager.subscribe(
    eventName = BlueConicEventManager.EventName.PROPERTIES_DIALOGUE,
    callbackObject = object : EventHandler {
        override fun handleEvent(event: Event) {
            // Cast the event to the specific PropertiesDialogueEvent in order to access the data
            val propertiesDialogueEvent = event as PropertiesDialogueEvent
            // Use propertiesDialogueEvent to retrieve data (variantId, position & data)
        }
    },
    onlyOnce = false,
    identifier = "callbackIdentifier"
)

// Trigger a PAGE VIEW event

// Use to unsubscribe from receiving events from the SDK
eventManager.unsubscribe("callbackIdentifier")
// Use EventManager to subscribe to events from BlueConic
BlueConicEventManager eventManager = BlueConicClient.getInstance().getEventManager();

// Use to subscribe to specific events from the SDK
eventManager.subscribe(
    BlueConicEventManager.EventName.PROPERTIES_DIALOGUE,
    new EventHandler() {
        @Override
        public void handleEvent(Event event) {
          // Cast the event to the specific PropertiesDialogueEvent in order to access the data
          PropertiesDialogueEvent propertiesDialogueEvent = (PropertiesDialogueEvent)event;
          // Use propertiesDialogueEvent to retrieve data (variantId, position & data)        }
    },
    false,
    "callbackIdentifier"
);

// Trigger a PAGE VIEW event

// Use to unsubscribe from receiving events from the SDK
eventManager.unsubscribe("callbackIdentifier");
The structure of the PropertiesDialogueEvent is as follows:
data class PropertiesDialogueEvent(
    var variantId: String,
    var position: String,
    var data: String
)
The data parameter, which is the JSON configured in the plugin, is a stringified JSON that you will need to convert to a JSON object or your specific data structure in the app.
Additional functionality
The SDK locale can be configured in the following way:
blueConicClient.setLocale("en_US")
blueConicClient.setLocale("en_US");
To retrieve the segments the current user is currently part of, use the following methods:
val segments: MutableList = blueConicClient.segments
val segmentId: String = segments[0].id
val segmentName: String = segments[0].name
List segments = blueConicClient.getSegments();
String segmentId = segments.get(0).getId();
String segmentName = segments.get(0).getName();
Create a Custom Mobile Plugin
BlueConic offers the possibility to build your own custom plugins for mobile, that can be integrated into your application, providing additional functionality.
To find out more about custom mobile plugins see: Custom Mobile Plugin for Android
Test the SDK integration
Enable debug mode
Add the following setting to the BlueConicConfiguration object when initializing the SDK:
...BlueConicConfiguration.Builder()
    ...
    .setDebugMode(true)
    ...
    .build(applicationContext)
Note
Setting Debug to true will provide more logging and enable the use of the BlueConic Simulator.
Warning
When you publish your apps, Debug should always be set false.
Add intent filters to the AndroidManifest.xml for connecting to the Simulator
Configure your appId at the android:scheme attribute in the code fragment below. For example "com.test.testapp". For more information on how to configure a connection to the BlueConic Simulator see: Testing a native mobile app in BlueConic.
<activity android:name=".MainActivity" android:label="@string/app_name">
  <intent-filter>
    <action android:name="android.intent.action.MAIN"/>
    <category android:name="android.intent.category.LAUNCHER"/>
  </intent-filter>
  <!-- Filter added for connecting to the Simulator through mail .-->
  <intent-filter>
    <action android:name="android.intent.action.SEND"/>
    <category android:name="android.intent.category.DEFAULT"/>
    <data android:mimeType="text/plain"/>
  </intent-filter>
  <!-- Filter added for connecting to the Simulator through a QR scan. -->
  <intent-filter>
    <action android:name="android.intent.action.VIEW"/>
    <category android:name="android.intent.category.DEFAULT"/>
    <category android:name="android.intent.category.BROWSABLE"/>
    <data android:scheme="<Your appId>"/>
  </intent-filter>
</activity>
Additionally, you can pass Simulator information directly to the SDK when you initialize it in the BlueConicConfiguration object, if you know your Simulator username and mobile session ID, by using the following method:
...BlueConicConfiguration.Builder()
    ...
    .setSimulatorData(simulatorUsername, simulatorMobileSessionId)
    ...
    .build(applicationContext)
Note
The use of the BlueConic Simulator is restricted to Debug mode only.
To test your mobile app, you will need access to a BlueConic environment. There are two options:
- Are you working on behalf of a BlueConic Customer that has a BlueConic environment set up? Ask a representative of the BlueConic Customer to request a Sandbox environment in which you can test your mobile app.
- Alternatively, request a free Pyxis environment yourself, and test your mobile app with that instance of BlueConic.
For more information on how to configure connecting to the BlueConic simulator see: Testing a native mobile app in BlueConic.
Migration guide
Migrating to version 6.x.x
Starting with version 6.x.x, the following changes need to be taken into account if you have an older version of the SDK:
- The SDK no longer uses an XML configuration file to retrieve the BlueConic hostname. The file can be safely removed.
- The SDK now requires that you first initialize it, before doing any other API calls. When initializing, you now pass your BlueConic hostname in the initialization configuration object. The initialization requires the Application Context, so it is recommended to initialize the SDK in your Application class.
- The SDK instance no longer requires the Activity context when retrieving it.
- The SDK factory class for instance retrieval was removed. Instead, access the SDK instance by using BlueConicClient.getInstance().
- The SDK now provides dedicated methods for PAGEVIEW, CLICK, VIEW, and CONVERSION events, so it is recommended to use those.
- The SDK Event Manager factory class for instance retrieval was removed. Instead, the Event Manager can now be accessed via the SDK instance using BlueConicClient.getInstance().eventManager.
- The SDK now provides dedicated methods for publishing ADVANCED, CLICK, FORM SUBMIT, UPDATE CONTENT, and UPDATE VALUES events in the Event Manager.
Release Notes
To see a list of updates and bug fixes for the SDK, see the BlueConic SDK for Android Release Notes.